Good evening, lovelies!! :) Today was my 3rd 12-hour work day in a row, hence why no post "on time" last night... I managed to get the 1st coat of base colors on & promptly fell asleep. Somehow I found the strength to complete the mani tonight - huge thanks go out to a homemade Big Train chai latte. ♥ At long last, I have re-created this fabulousness from the queen of glitter placement! Mine is of course not nearly as good by a long shot, but for my very first attempt at what she does, I must say I'm rather pleased. :) ...mostly with the fact that I persevered!
I used: SinfulShine My Kryptonite (2 coats), Zoya Noot (2 coats), and OPI The Living Daylights (meticulously placed with an orange stick!), Duri Rejuvacote (base & topcoat), plus a thick layer of Seche Vite to seal and smooth the accent glitters. I know, this is highly atypical of my lengthy, wordy posts but honestly my eyelids are about to close! I promise I am going to come back and expand on this mani and probably add another pic or two, as well as discuss my finds & follies and with this technique. ;)
When I saw "gradient" was one of the inspirations for this challenge, I cogitated for awhile, mentally pouring over all the different creme options I had, or maybe even a holo gradient, but I kinda already did that this past summer... And then KABOOM!, outta the blue, I knew exactly what I should do: a GRAYdient!!!!!!! Puns and plays on words are totally my thang, so don't that just beat all! :D LOL
I laid down two perfect, smooth, shiny coats of Cult Nails Tempest. Seriously, I was rubbing my nails ALL DAY. Now that I've used it for a full mani, I would recommend it as the ultimate white creme. PERFECTION!
And then I grabbed my grays; note that the night before I did this, a perusal of Wal-Mart's beauty aisle endcaps rewarded me Pure Ice's Kiss Me Here, which I'd been looking for since I saw it on my friend Essie's blog last spring! Who woulda thought that a Pure Ice polish would be so stinkin' hard to find?! Well it was, and it also happened to be the perfect gray to complete the GRAYdient! 'Twas meant to be!
Or NOT. Uhhhh...NOPE. Just no. :( THIS LOOKS AWFUL!
Why did mine look more like color bands than a smooth, melty blend?! And patchy and ugggh... Well, for some reason I thought you were supposed to take a tiny piece of sponge and sponge on the colors one at a time.
After some research & consulting experienced nail art blogs, I discovered you're supposed to use a wedge makeup sponge & paint all the colors on in strips and use it rather like one big foamy stamp! DUH. Oh well, I am now "in the know" for the next time I attempt a gradient. But for now, I'm going to chalk this up as a learning experience and move on to the next mani!
BUT first...
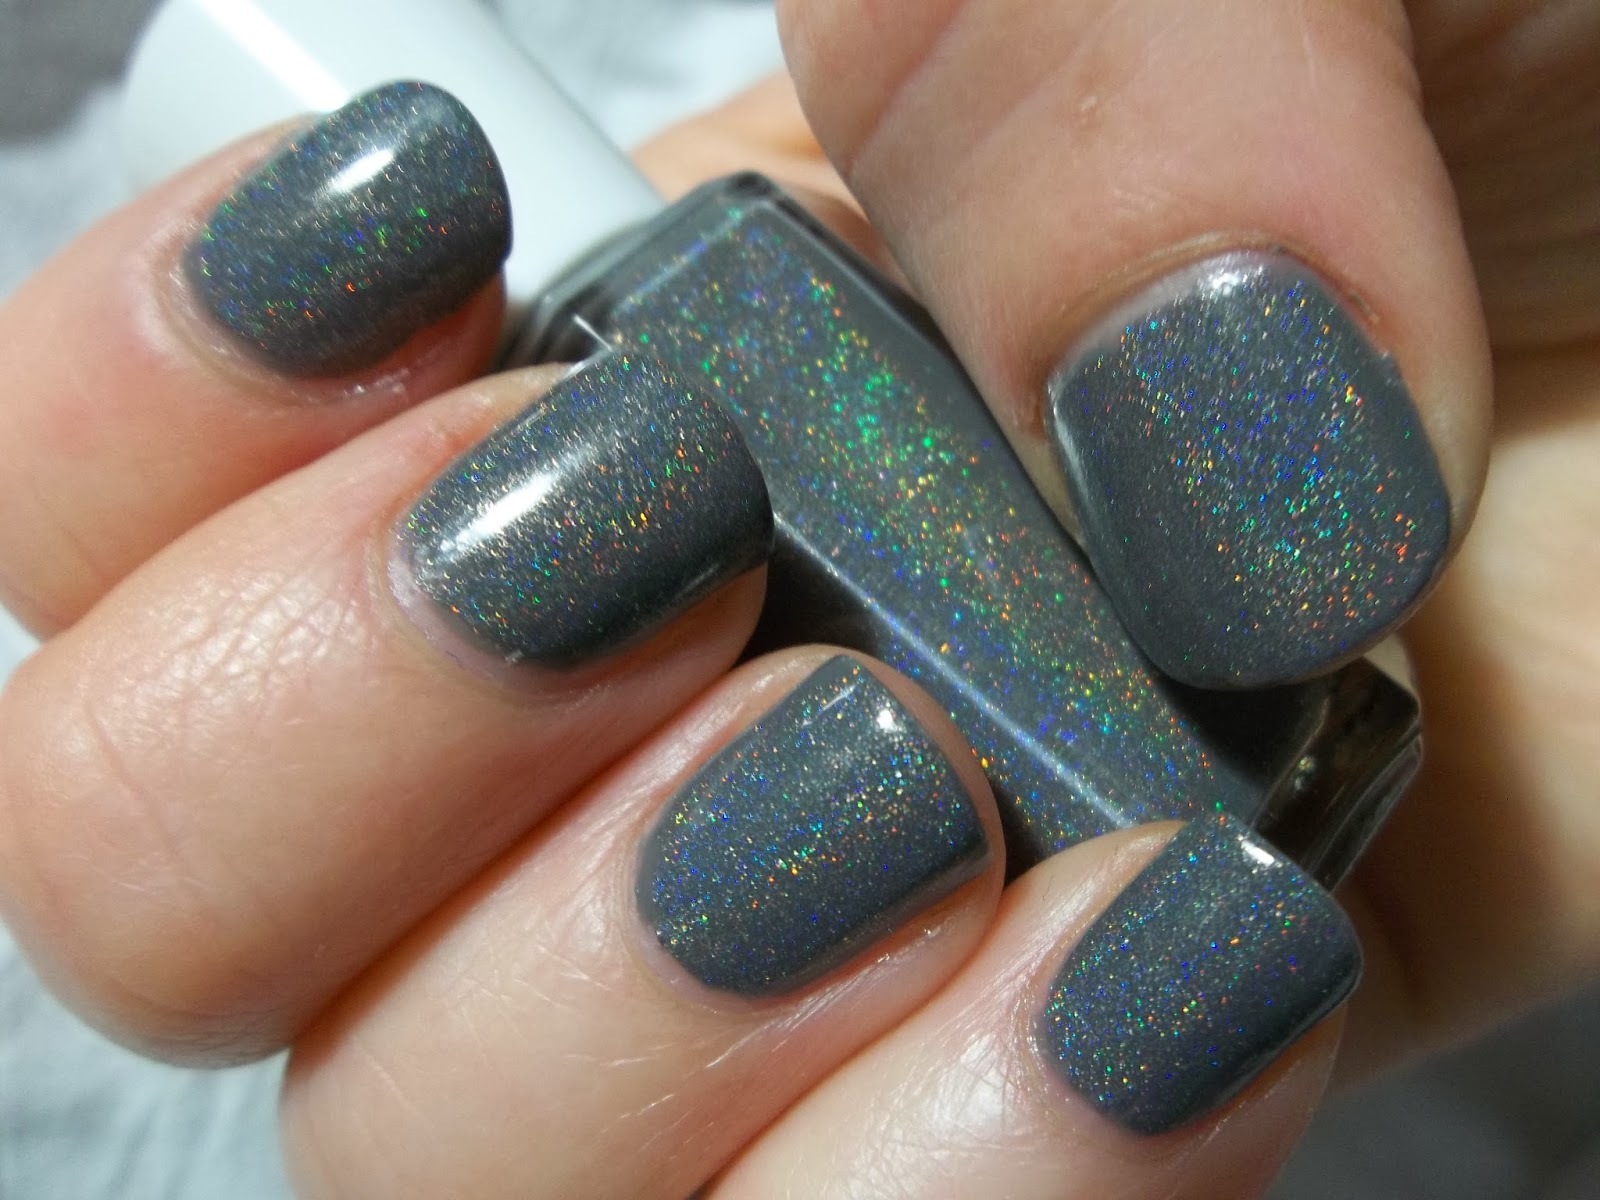
after that horror, I will give you a nice gray to feast your eyes on:
GRAY HOLO!!! :D This is Hit Polish Pewter Goblet. Not a strong linear holo, but very purty nonetheless, and it satisfied my desire for Too Fancy Lacquer's Silent Night at a much lower price! Unfortunately, Hit Polish closed up shop as of a couple weeks ago due to a new business venture for her & her hubby.
This is one coat Pewter Goblet over two coats Kiss Me Here. PG is a tad sheer on its own, and KMH really is the PERFECT MATCH to go under it. Polish serendipity, I tell ya! These photos are without topcoat - it's just that shiny. :) PG actually felt a bit thick and gloopy to me, but a thin-medium coat was perfect, dried fairly quickly, and obviously, produces a nice holo effect.
And I happened to be wearing a gray sweatshirt, so hey, why not do a good ol' Essie "sweater shot?!" :D Except I'm clearly not her, so it didn't really turn out... I'm blaming it in part on the fact that I was operating the camera with my non-dominant hand! lol
For quite some time now, I've been fascinated whenever I see someone's galaxy mani post, and just the other day as we passed a rack in Rue 21, a friend of mine commented on how cool the "new" galaxy leggings look. SO when the "nature" theme rolled around in this challenge, I decided why not attempt my very own nail galaxy?!
I dare say it turned out pretty well and I have no idea why I waited so long to try a galaxy mani! This was surprisingly easy and FUN. Choosing colors definitely got my creative juices flowing and really, the sky IS the limit! hehe
According to one blogger who will remain anonymous, you have to use a black creme base for it to look realistic, but I think my alternating Zoya Ibiza and Skin Food 05 (darn Korean brands!) create a lovely dark blue shimmery space. ;)
This mani made me like Ibiza more than I did at first application a few weeks ago, but I still had some pulling/dragging issues and re: drying completely... let's just say galaxy manis are GREAT for covering up slicing gouges and sheet marks!
This may be a bit of a "wild" and colorful galaxy, but whatever... I think it's purty! And boy did I ever use a plethora of polishes for that prettiness:
Top row, L-R: OPI DS Extravagance, Cameo Colours Lacquers The Glass Slippers, Zoya Ibiza, Cult Nails Tempest, Hits Cha Cha Cha,
Bottom row, L-R: OPI Solitaire, OPI The Living Daylights, NOPI Just Busta Mauve, Sally Hansen Lacey Lilac, Venique Galoshes Glow, Skin Food 05
My favorites were probably The Glass Slippers (amazing super sparkly white yet not white; it's made of tons of tiny pink, blue/green, and gold flakies) and Just Busta Mauve. :)
Using tiny chunks of makeup sponge and a tweezers, I pretty much went to town; a dab or two here, a smoosh (no, not a smooch !) over there, swipes of flakie glitter, and dots of Tempest with one of my dotting tools. I also used the dotting tool to place The Living Daylights "glequins."
Yup, I officially L♥VE it and foresee many more nail galaxies in my future. :) I think next time, I want to try making actual constellations on them; hearkening back to my adolescent years with my little friends, studying books on stars and learning as many of the constellations as we could. :) "What is life but a collection of memories, made and yet to be made?!" - uhh, ME!
I've never tried my hands (hehe!) at a blogger challenge before, but maybe now is a good time to start... it is a new year, after all. And I just happen to like the subtitle of this challenge. :) So today I have for you my take on the "fresh" mani. Yes, I know it's a day late, but I worked 'til 6 last night and then had to pack up and drive to my parents' house in some mighty treacherous weather. Side note: this also happens to be the first mani in a LONG time that I've even bothered to photograph & been excited to share on my blog, despite some imperfections. The posts from this past week were all manis from months ago.
Using Zoya Godiva and L'Oreal Eiffel For You, I applied two easy coats each, then decided to add one extra coat of Godiva for maximum opacity and sparkle. To me, these lovely nudes/neutrals classify as a "fresh" look. I don't know, maybe I'm waaay off! But alas I don't really know what Californails had in mind when she said "fresh." So I'm using my imagination!
Please be kind - my cutes got trimmed against my will & I'm having a heck of a time reconditioning them. :(
What, you might be asking, is that fabulous stamping image?! I know I always ask myself as soon as I go to a blog and see what must be a stamp used in a mani. This gem is from MoYou London's Pro Collection plate 04, stamped with Color Club Revvvolution. Side note: they also have an XL plate with this script image for those of you with bigger nail beds. Unfortunately, I'm not lucky enough to be blessed with 'em!
Ok, this is an unconventional shot, and maybe it's not "okay" to do this on a polish blog, but I thought it might be fun to play with the exposure and make it look all softened out and glamorous, perhaps? Oh, and check out all that silver microsparkle that becomes fabulously obvious in the bottle?! Gosh I love Zoya's Pixie Dusts! I scored this baby during one of their December flash promos. :) Pardon the fuzzy on my pinkie nail... Disclaimer: no fuzzes were harmed in the photographing of this mani.
I purposely included this one to showcase the glorious Godiva sparkle! So, so nice. At first I was a bit dejected that it didn't have the golden crumpled tin foil look of Tomoko, but now that I have it on, I absolutely love it, as do my roommates and a couple friends. :) Dry time is so nice and fast for the Pixies, compared to how long I have to wait to ensure my cremes don't bubble upon application of the second coat. And it's especially nice that textures are supposed to be...well, textured!! lol Can you tell how sick I am of bubbles in polish that is supposed to be smooth?!
Thank you for taking the time to peruse my humble blog, and feel free to jump in on the challenge with me!!! :D
I did this post as a guest post a number of months ago for Guilty As Charged in her absence, but she had some issues with the scheduling feature so I just figured I might share it here on my own blog as well, in case you guys missed it, and because I will be out of town this weekend with positively no time to do a post. :-/ So I really hope this isn't considered "bad blogger form!" I just l♥ve this mani and could share it over & over again! LOL
My original mani plan ended up having an element that just would not work, so after going back over the ideas I'd had for this post, I decided this one was much more fitting anyways, since Haleigh's blog features such great nail art. I hope mine is worthy of being here! I give you Fowl Play:
I cannot even tell you how excited I was to find out that OPI's Merry Midnight has an almost exact dupe. I wanted MM after seeing only one photo of it, but when I discovered it was going for upwards of $25 on eBay, I was quite sad. Then along came a comparison post (or several!) with Orly Fowl Play, and with some trepidation, I headed back over to eBay. This time however, I was overjoyed to find I could get my dream polish for only $5!!! Mmmm...just feast your eyes on that vampy purple, flaky, sparkly, rainbow-y goodness!
Being a huge fan of plays on words, I had a "liiiightbulb" moment and realized that freehanding an owl as an accent nail would mean I could entitle my post Fowl Play! ;-) hehehe
Isn't he a cute 'lil guy?! :-D I think he needs a name...any ideas?
Mr. Unnamed Owl is composed of Zoya Reagan, Sinful Colors My Buoyfriend, Zoya Arizona, and just any old black & white for the eyes, against a background of OPI Can't Find My Czechbook. The color combos are truly endless, which is super fun! :-) I don't actually have a nail art brush set, but a detail brush from my roommate's set of craft brushes (from Wal-Mart) worked just fine. I also used a pin - yes, A PIN - for the beak & the dots on the owl's body, as well as the black pupil & the teensy, infinitesimal, tiny, microscopic white glint on the pupil.
In case you were curious, I did end up doing my right hand because I really want to be able to wear this mani for a few days, so I had to at least attempt to make my hands match! He's a tad...deformed, but still loveable. :-) OH! I almost forgot - the branches are China Glaze Ingrid. Pretty much the only brown I have in my stash. And of course, it has a fine gold shimmer in it, so my apologies, but Houston, we have a sparkly branch!
The application of all these polishes was really great. Ok, yes, I used most of them in minute quantities, but I was glad to see they were all very opaque as there was a lot of layering going on! This is only two coats of Fowl Play. I think I would classify it as a couple-shades-lighter-than-eggplant purple jelly base, but it's highly pigmented, so the coverage is great - as is the drying time. I've had SO many issues with bubbling cremes lately, so this was quite a welcome relief.
If any of you have read my blog, you know I'm very long-winded, and I'm sure I could continue on about this mani, but I feel I've kept you long enough, especially since this is a guest post! I leave you with one final shot:
Thank you so much for reading! I hope this inspires you to be creative & boldly go where you've never gone before...on your nails. ;-) Or in life.
Hey ladies! I'm pretty excited to show you this today. My first attempt at a glitter gradient!! I was trying to come up with ideas for something my best friend would want to wear with her stunning outfit for a friend's wedding in Chicago; a wedding for which she played piano and sang, and her husband officiated.
So it needed to be stellar. And since she's a pianist, it had to be executed in a way that would ensure staying power.
After showing her a couple of my ideas that I'd done on those clear Sephora cellophane squares with fingers outlined on them (maybe you've seen them in stores now? They're for testing out the polishes :-), something in what she was describing made me show her this mani:
Her response: "Oooh! I l♥ve that!!" ;) So the next night I set to work on my own nails so I could practice the technique and test drying times on a couple different options of reds and I wanted to show her another color just for the sake of variety. :)
The difference is almost inperceptible; I have Zoya Karina (2 coats) on my thumb, Sally Hansen Unbreakable Heart (2 coats) on my pointer & index, and Zoya Daul (1 coat over OPI Dutch Ya Just Love OPI?) on my ring and pinkie. Personally, I love the extra glitzyness that Daul lends to the gradient, but Michelle opted for the classic red - her favorite nail color. :)
Don't ask me why, but there is some optical illusion going on making it look like I got the red all over the side of her ring & pinkie fingers. It's not, I promise. So, pay no attention to the optical illusion behind the curtain and focus on the loveliness! ;) (and a gold star to anyone who caught that movie reference)
I will however make the disclaimer that for some reason, my photos are not showing the warmer tones that Zoya Karina has IRL. :( I did try to edit and color correct them, but it still came out more of a dull, cool brownish tone. :-/ Grrr! I'm so sorry, readers. :(
Both of us together!!! :D ♥ This was SUCH a fun night... I gave her a full-on mani/pedi complete with foot soaking and massages. I love doing that kind of thing with/for my friends!
To execute her mani with staying power, I started with one base coat of Orly Bonder, then 2 coats of Sally Hansen Unbreakable Heart (a rich, vibrant shimmery cherry red with tiny gold microflakies), and then I took a tiny triangle of makeup sponge and using a tweezers, I sponged on Essie Set in Stones and Milani Gold to add more depth to the effect. Then I covered the whole thing with Sally Hansen Ultra-Wear Top Coat (the box says "Salon perfect finish up to 10 days. Guaranteed." They're the same bottles as the Salon Manicure line with the silver caps).
Oy. Trying to photograph two peoples' hands in the same frame is NOT as easy as I thought!
Not to mention I was laughing so hard my hands were shaking. :P
Aaaand apparently my plan and the polishes worked because I talked to my friend on Friday and she still had no chips! I did the manicure the previous Wednesday and she'd played piano on Sunday morning and again for the wedding. :D :D ...plus full work days of typing. WIN! Oh, I forgot to add, I had her take top coat with her and put on a second coat while they were driving the next morning. It was about 11 pm by the time I finished doing her mani (and the matching pedi - I did the gradient on her big toes :), we were super loopy, and after the photo shoot, we were done for, so the 2nd application of top coat had to wait!
My hand, chillin' out in the background ;) SO hard to get both on the exact same plane
I hope you enjoyed ogling the prettiness - I know I sure did! Seriously, I was constantly admiring the extreme flashiness of Set in Stones in the fluorescent lights at work all day, every day I had this on. ;)
And rest assured, there will be future twinsie manis because I (&, hopefully she) had a blast doing this!!!
I have played around with dots before (some of you might remember this mani & this mani), but I've never done a full-on dotticure. So the other night I busted out a bunch of fun, vibrant cremes and a super sparkly foil and just went for it! I thought the colors looked awesome together in the bottles, but I wasn't such a fan once they were on my nails in tiny dots. :-/ I'm not entirely sure why...maybe it just felt too kiddish for me? My inspiration was this dotticure from The Polish Playground, and I think I like her color palette much better. Feels more grown up & refined!
I used one coat of Sinful Colors My Buoyfriend on all but my ring finger, which is two coats Sinful Colors 24/7 (no undies) which I will again tout as the perfect chalky neon pink!, then used Zoya Arizona, Essie Mojito Madness, My Buoyfriend, 24/7 and Skinfood Glipop Pedicure Sparkle 05 (annoyingly "named" yet gorgie South Korean polishes!) for the dots. :) All sealed with some Seche Vite.
In an uncharacteristic move for me, I'm only showing you one photo of this mani, simply because I didn't really love it. I think it might have to do with the fact that the first thing that popped into my head once I had it all done was: Día de los Muertos sugar skulls. e.g.:
Yes, this is a cookie, but you get the idea.
I hate skulls. Can't even believe I'm putting this on my blog! :P Anyhoo, maybe some of you will find this super fun and awesome... if anyone wants a dotticure for Día de los Muertos, come see me!
As many of you probably know, Essie of iHeartPrettyPolish has announced that she is stepping away from blogging, possibly forever. :( HUGE sad face! But I'm also very proud of her for making a hard yet necessary choice, for her well-being.
In honor of her fabulous style and famous skittlette combinations, some of her blogger buddies and I (Melissa of Lacquer Reverie, Christine of Polished Marvels, Liesl of Liesl Loves Pretty Things, and Dani of From Polish, with Love), inspired by her manis, hatched a secret plan to create our own skittlettes to celebrate & appreciate her & let her know she's loved - whether or not she is blogging - and will always be an inspiration. :) So here's to you, Essie dear!!!! :D
Each polish used in this mani has a story. Thumb: Zoya Reagan
I first saw it in one of Essie's posts, and was convinced it was the perfect raspberry creme. It is. Pointer: Essie Sand Tropez
This is especially special - the polish that started my & Essie's friendship. :) I had commented on her post about this polish, saying I was looking for the perfect nude, and she graciously offered to just send it to me because it wasn't right for her skintone. Middle: Butter London Victoriana
A brand-new acquisition as of yesterday, highly recommended by Essie as one of her all-time favorites. I can totally understand why! Ring: Julep Trina + Hit Polish Retro Chic(now d/c & 40% off, fyi!)
Essie included this one as a little surprise when she sent me Sand Tropez, which was unbelievably kind...my first introduction to what a great group nail bloggers are! I topped it with Retro Chic because in her skittlettes, she usually did a blingy accent with a Shimmer polish. Having none, I improvised & I think the colors of glitter in RC go well with the cremes. :) Pinkie: Essie Mojito Madness
Another one I saw in an old post of hers. I fell in love with the shade, and despite my trepidation towards greens, I had to have it. Boy, am I glad I saw that post! This polish transports me to a tropical isle every time.
All of these polishes have top-notch formulas, easy two-coaters (some only one: Reagan, Trina, & Mojito Madness), and they dry super shiny! I only put Seche Vite over the glitter accent nail. For real!!
*Note: I did use two coats of all except Trina & Retro Chic simply to ensure the highest quality for this post.
My blog would probably not exist were it not for her. Here's an email excerpt of her prompting me to start one: "Well maybe you should have a blog. :) Let me know if you need help starting one! I'll be your first follower. And awesome that you are in Minnesota. That's another reason you need a blog, I have no other bloggers in MN that I know about. :( I'm lonely."
Once I decided to take the plunge, she gave me SO much support & countless helpful tips, like turning off the word verification thing for comments, nail & cuticle care (including her own routine), and a helpful guide to painting your nails neatly when she saw how frustrated I was getting with it. :)
I want to thank you SO MUCH for being a part of not only my hobby blogging life, but also a real-life friend - even though we've never met. You're a wonderful person whom I feel so privileged to know. I wish you all the best in life & in blogging, should you ever decide to come back. :) ♥
Say whaaa . . . ?! YES, you heard me correctly (or rather, you read that correctly ;-). As a dear blogger buddy of mine has said, inspiration can come from ANYWHERE! So when Liesl (yes, the Liesl of Liesl Loves Pretty Things) posted a photo of her ailing knee, our mutual friend Essie (a la iHeartPrettyPolish) zeroed in on no, not the knee, but the SOCKS, and suggested we do a mani based off of them. :-) And such is the life of a nail polish addict . . .& her friends!
I'll spare you the XL-sized photo of this one! ;-)
A flurry of comments ensued as we chimed in and agreed that would be a nifty way for our three blogs to connect, (I'd like to take this moment to mention that I'm incredibly honored to have anything to do with their blogs, as they're totally amazing & have earned their place in the big leagues!) and for us to have fun with something, shall we say, unique & a tad off-the-wall? :-)
And then I imagine our minds separately set to work attempting to puzzle through what we were going to do with a sock and a knee injury and . . . nail polish. Well, this is what my cogitation kicked out:
First of all, can I just say how unbelievably GLAD I am that someone from PAA (Polish-aholics Anonymous, a fab Facebook group) mentioned their copious research on bulbs & came up with "daylight" compact fluorescent bulbs (Wal-Mart brand, no less!), because it looks like it's going to be stormy 'til the end of time here. I was rather despondent until I remembered the lightbulbs I just bought! For having no light box & simply putting one into our resident living room floor lamp, I am stunned at the color accuracy and ease with which I was able to get quite satisfactory photos! Ok, that digression got to be a lot longer than I anticipated! My apologies, but I was/am quite excited about this. :-) I can take awesome photos in the middle of the night! Boom bayyyby!
This is what I used:
L to R: Sally Hansen 4-in-1 Complete Care (used as base), L'Oreal Eiffel For You, Zoya Neely, Zoya Yara, NYC French White Tip, NYC Skyline Blue, China Glaze Rich & Famous, Venique Ga-loshes Glow, NYC Matte Top Coat. Oh, and the tiny craft paintbrush! Couldn't have done it without him!
I really couldn't think of anything to do but replicate the look of the sock! So after my ever-present base coat, I started with two coats of Zoya Neely on all my nails, then used the saran/cling wrap technique on thumb, pointer, & middle to sorta sponge on L'Oreal Eiffel For You - a beautiful, warm greige - to mimic the heather look of the sock. I also went back over that with some sponged-on Neely to soften the boldness of the greige.
Originally, I was just going to do stripes on the standard accent nail, but since this is a mani in honor of Liesl's injury & her awesome sock, I thought: "why not do the pinkie as an 'accent' as well, like she does?" :-)
I was able to use Yana, Skyline Blue, and of course, French White Tip right out of the bottle, but I had to get a bit creative for the other stripes. So the pink & yellow-green were products of Rich & Famous + white and Ga-loshes Glow + white. The heather stripes didn't quite come out as good as they first appeared (esp. with the matte coat), but I don't think it was too shabby! :-) Especially in light of this being my first attempt with freehand stripes. It would probably be fine for someone with a steady hand, but that's not me! And I suppose the medium latte with an extra shot earlier in the day didn't help much. ;-) ...well, it did...it kept my head from hitting the keyboard at work!
Originally, I had not given any thought to my topcoat, but as I was gathering my polishes, it dawned on me that DUH, socks are not shiny, so MATTE is the obvious choice!!! :-D I was quite pleased to have thought of that, and I think the matte is the perfect icing on the sock, so to speak. :-)
Well, I think that's all I have for you. Please be sure to head over & check out Essie's & Liesl's posts - they're as stellar as always! :-) And remember: inspiration can be found anywhere - have fun with it!
After my trip to Chicago, I've been feeling rather uninspired and blaah about blogging...figure that one out: Chicago should've been chock-full of inspiration! And really, it was, but I think the trip and the last couple weeks have just taken a lot out of me. Anyhoo, after poring over some really awesome nail art posts this week, and pulling from some old favorites as inspiration, I came up with this:
Left hand!! Oh YESSS!
I decided it was time to "go big or go home," so to speak, and I think I accomplished "big." :-D It's by no means perfect like so many more experienced nail art bloggers, and of course the area around the cutes is not immaculate and perfectly rounded (I cannot for the life of me figure out how they manage that, even with detailed, intense cleanup!), but anyhoo, I feel rather proud of this mani. :-)
On to what I used and the process!
L-R: Essie Fill the Gap basecoat, Maybelline Green With Envy, Skinfood 22W (Korean polishes & their numbers...sheesh!), Essie Mojito Madness, NYC French White Tip, Rimmel Hot Black To Go, Zoya Vespa, and Sally Hansen 4-in-1 Complete Care
I started with Fill the Gap which is my new base and I really love it! It's almost like OPI's Barre My Soul, but it dries to a satin finish. I have considered wearing it on its own, actually. ;-) Last night though, it was behaving strangely and driving me nuts...the humidity here was pretty atrocious (which I think gave all the polishes a bad attitude last night :-P ) and we had a ceiling fan on over the table, so that probably added to the issues. I actually had to redo the base coat on my left-hand thumb and pointer.
ANYways, I proceeded to lay down Rimmel Hot Black To Go on my thumbs and pinkies and Maybelline Green With Envy on the rest.
Not too shabby! This was with no cleanup. :-D If I were channeling Essie, I would've probably happily stopped here. ;-) . . . But I couldn't quit! Must. press. on!
Having done dots before, I knew they were relatively quick 'n easy, so I started with Skinfood 22W (a blow-your-mind bright sky blue metallic foil!) & used a good 'ol yellow wooden pencil tip as my dotting tool, making a diagonal line across my pointer and ring fingers. I then added rows in Mojito Madness and French White Tip. Sorry, it went so fast I didn't have time to take pictures! :-P . . . so I'll just have to show you another one of the finished product! Oh bother!
The middle finger was originally going to be stamped with a Bundle Monster design, but the Rimmel black and a Revlon shimmery black were not stamping well, and I stamped crooked, tried a different design, even gave black acrylic paint a try! But I just wansn't feeling it, so my eye spied the newspaper on the table & thought ah HA! I've been hankering to try the newspaper transfer technique! Only took a little rubbing alcohol, some rubbing, and voila!
Here's a YouTube video with a few different techniques:
Then on to the most challenging part of the mani: the hand-painted roses. :-/ The blog I originally saw them on (www.workplaypolish.com) said they were really easy to do as the lines that form the petals are supposed to be "organic" and not "perfect." That is correct, but it was still a painstakingly long process as I wanted them to be easily recognizable as roses. Working with a Zoya Pixie Dust was a tad difficult as it dries to its gritty, lumpy texture relatively quickly, especially in such small quantities (for all the dots & the roses, I'd just place a dab of the polish on a piece of cardboard). I don't have an actual set of nail art brushes, but my roommate just bought a huge pack of pretty good quality craft brushes, so I used a brush with a rounded point, 1/8" wide x 1/2" long bristles. The technique itself is fairly simple: start with a dot (either centered or off-center, whatever strikes your fancy) and make curved lines radiating out from the center.
I ended up loving my left pinkie ^ and right thumb the best.
Right pinkie was awful! I ended up going back with black to "erase" some of the misshapen Vespa blobs & then redefining them with more Vespa. Painstaking process, let me tell ya! No wonder it took me like, 3 hours start to finish! Gotta give a shout-out to my other roommate for helping me keep my strength up during this nail art marathon by literally feeding me grapes when I couldn't touch anything. :-D
Speaking of finishing, I believe this post is coming to a close - to which you are probably drawing a sigh of relief!! I finished the minty fingers with the Sally Hansen 4-in-1 clear coat (given to me by my sister - she wasn't a fan). But I really like it as it can be used as a base that is really nourishing & also claims to help fill ridges (thanks to bamboo extract), and then as a topcoat which although is not nearly as fast drying as Seche Vite and doesn't have that thick, glassiness to it, but it does add a nice shiny protective layer WITH NO TIP SHRINKAGE! :-D lol There are tradeoffs to everything, I guess. ;-)
Decided to try a pose I saw on another blog...kinda "meh" about it.
Well, I hope you ladies like this "mismatched" look as much as I do and maybe it'll inspire you to try something similar! Thank you again for bearing with me through a long post . . . apparently I can't be succinct to save my life!